|
| |
ILLUSTRATED DRAWING of CUBIC FORMS
(Abstract)
|
|
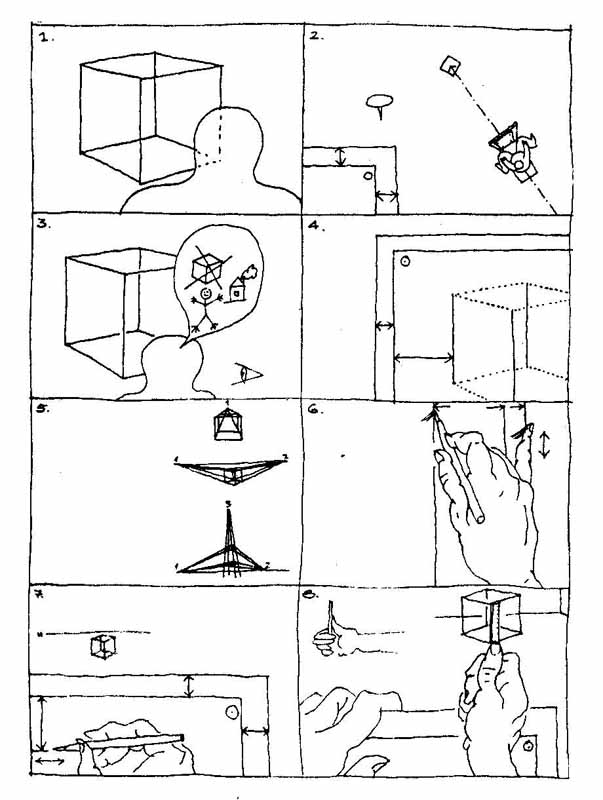
Next I shall try to summarize by illustrations the most emphasized starting steps of drawing a single cube.
|
|
1. Let us select the best possible view point! We ought to see the complete setting first. Each of the frame's edges should be clearly visible. Colleagues eventually sitting in front of us should not hide important bottom corners. At the beginning, let's avoid special positions when edges seem to cover ech other!
2. The longitudinal axis of the drawing seat should aim the center of the set. We should use drawing pins (or tape) to fix the paper to the drawing board.
3. We should carefully draw what we really see from our given view-point. Former prejudices should be forgotten.
4. Verticals follow the vertical sides of the drawing which are parallel to the vertical edges of the drawing board.
5. Sitting in front of the cube we'll have one vanishing point. Sitting diagonally (in a general position) there are two vanishing points. In both cases verticals won't get distorted. In a third case (dealing with tower-like set-ups) we shall have three vanishing points when even verticals converge. |
|
| |
6. A practical hint for drawing lines parallel to the edges (main directions): keep your small finger sliding on the edge of the drawing! Leaning hand on the small finger might eventually be also useful against the bad habit of some of us called "carving".
7. In order of controlling horizontal lines we should use the upper edge of drawing board.
8. At the beginning, let us use our pencil for measuring some major relations! This procedure needs the measuring arm kept in a streched position - our thumb will act as a slide on the pencil for catching the virtual section.
|
|
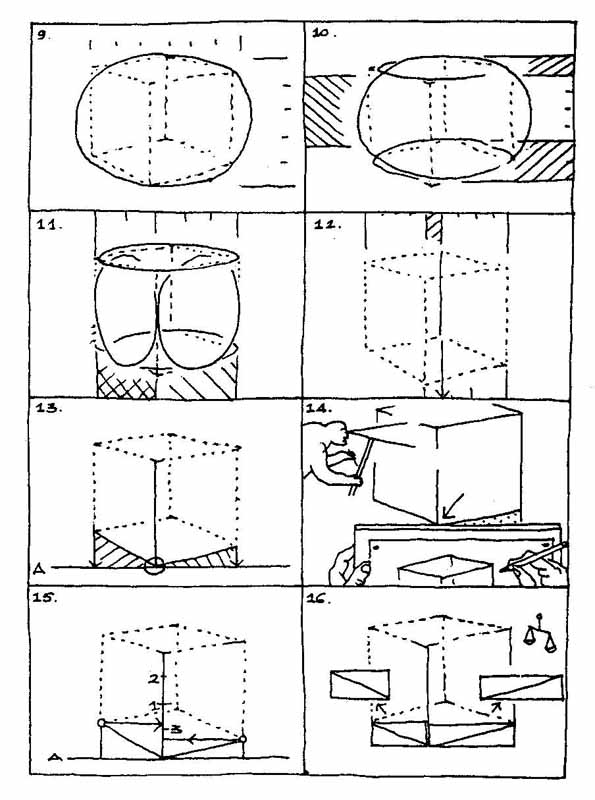
9. Making composition means how to put the sight over to the paper? Let us find a simple framing picture! We should keep some air (surrounding) around the subject matter. Surrounding is composed of foreground, background and two lateral fields.
10. Preliminary subdivision of the framing picture: horizontal projection of corners to a vertical scale.
11. Vertical projection of corners to a horizontal scale show the proportion of side planes.
12. The fourth vertical edge should also be projected down to the horizontal scale.
13 - 14. The apparent "steepness" of the floor-edge starting off the nearest bottom corner is the foot angle's tangent. Let us carefully observe the complementary triangle (called negative shape) as well!
15. Measuring an angle here means that with the help of the upper edge of our drawing board, the virtual height of an external corner should be horizontally projected to the nearest vertical edge which we use now as a comparing scale. The numbers indicate the chronological order of its subdividing (quartering). |
|
| |
16. Examining the proportions of foot angles (positive and negative triangles). Let's check the following: The vertical component of a side corner belonging to the smaller side is bigger than that of the larger side.
17 - 18. Examination of the intersection between the bottom square's backside edge and the nearest vertical edge (acting now as our vertical scale).
|
|
19. Controlling of top plane's virtual height. By lenghtening the vertical scale, we may determine the proportion of its distortion.
20. Fixing the proportion of the shaded part (How many circles might be compressed into the inward field?)
21 - 22. Analysis of dissected triangles.
23. Examining negative shapes around the cube's outlines.
24. It is important to observe the cut-in-lines of the surrounding, too!
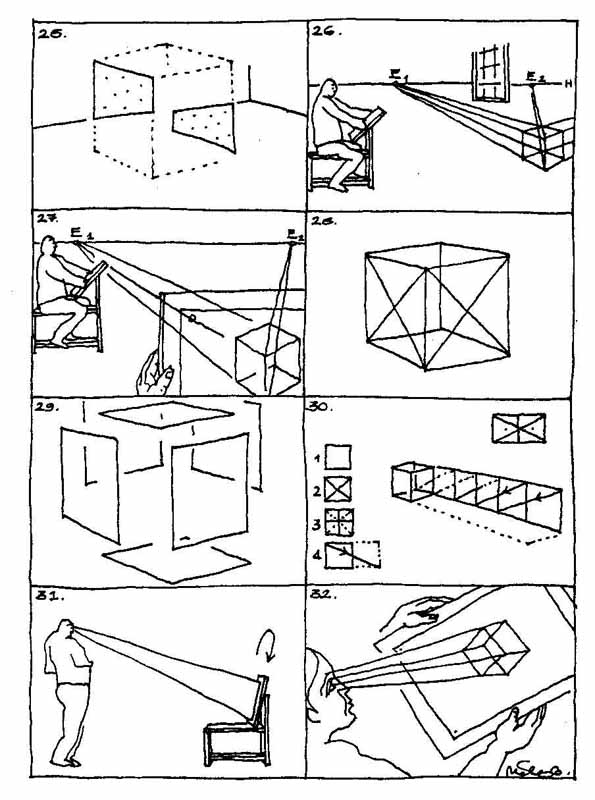
25. Incising the background into the object's contour helps us to better determine framing picture's subdivisions.
26. By projecting a near-by wall (or window) subdivision over to the subject matter, we may determine the eye-level on which even the diagonals' vanishing point might be found. |
|
| |
27. In perspective, parallel edges belonging to the same horizontal plane seem to converge and meet at a vanishing point on the horizon. Two vanishing points seldom happen to fall on our drawing paper. That's why we often check that of the diagonals first!
28. By adding virtual diagonals we may better control the final quality of our perspective squares.
|
|
29. Finally the side planes of the cube ought to be controlled one by one (we are trying to hide the rest for an instant).
30. Through the "diagonal method" (detailed by numbered figures) a single square might easily be multiplied. Reflecting a corner through the opposite halving point, we'll get the next unit.
31. From time to time we ought to stand up and look from a distance with fresh eye at our drawing. Let us control verticals holding the paper upside down!
32. Let us control converging lines also by the method of placing our head into the presumed position of the vanishing point! Often a mirror (or seeing through the paper itself) also helps to find mistakes. |
|
| |
|
| |
![]() © All rights reserved Associated Professor Balazs Mehes PhD
© All rights reserved Associated Professor Balazs Mehes PhD
recommended resolution 1024×768
|